Conducting an Orthodontic Assessment

Author
Date Released
Sum
29/04/2020

This lesson aims to guide you through conducting an accurate orthodontic assessment.

Extra-Oral

  • Record the skeletal pattern:
    • See 'The fundamentals of orthodontics' for the different skeletal pattern classifications.
      • *These involve looking in the antero-posterior plane - meaning looking at the person from side on, and assessing the jaw relationship from front to back.
  • Assess for any facial asymmetry (transverse jaw relationship) and record in notes.  
  • Assess the vertical jaw relationship:
    • The face can be divided into thirds:
      • Top 1/3: top of forehead to the glabella (between the eyebrows) = UAFH (upper anterior face height)
      • Middle 1/3: glabella to subnasale (base of nose)
      • Lower 1/3: subnasale to menton (base of chin) = LAFH (lower anterior face height)
    • An average face will have UAFH = LAFH
    • Record whether any of these thirds are increased/reduced 
    • These facial heights can have an influence on the teeth. 
      • A reduced LAFH may relate to a deep overbite.
      • An increased LAFH may be associated with an AOB (anterior open bite)
  • Assess the Frankfort Mandibular Plane Angle (angle of the slope of the mandible): 
    • To do this they use the Frankfort plane (orbitale to porion = the base of the orbit to the Ear) and the Mandibular plane (slope of lower border of the mandible).
    • They draw imaginary lines along these planes and assess the angle of where these meet. 
    • Ideally, the lines should meet at the back of the head and the FMPA (Frankfort-Mandibular Plane Angle) should = 27 degrees
    • If these lines would meet in front of the back of the head, this means the slope of the mandible is steeper, and the FMPA = greater than 27 degrees
    • If these lines meet further behind the back of the head, this means the slope of the mandible is shallow, and the FMPA = less than 27 degrees. 
  • Assess soft tissues:
    • Lips: are they competent (meet at rest) / incompetent (apart at rest).
      • Make a note of whether the lower lip is in front / below / behind the upper incisors, as this can influence treatment. 
    • Tongue: a large tongue which thrusts upon swallowing can influence where the teeth are.
    • Habits: thumb sucking can lead to:
      • Anterior open bite
      • Increased overjet
      • Proclined upper incisors / retroclined lower incisors
      • Upper arch narrowness
    • If pt has a habit, this must be stopped before treatment begins.
  • Assess TMJ:
    • Ask pt if they experience any pain, clicking or limitation of mouth opening before treatment and assess these appropriately – as in a routine E/O examination.

Intra-Oral

  • Start with recording the teeth present. 
  • Assess the teeth in occlusion: 
    • incisor relationship, canine relationship and molar relationship (remember the permanent teeth have to be there for this to occur). 
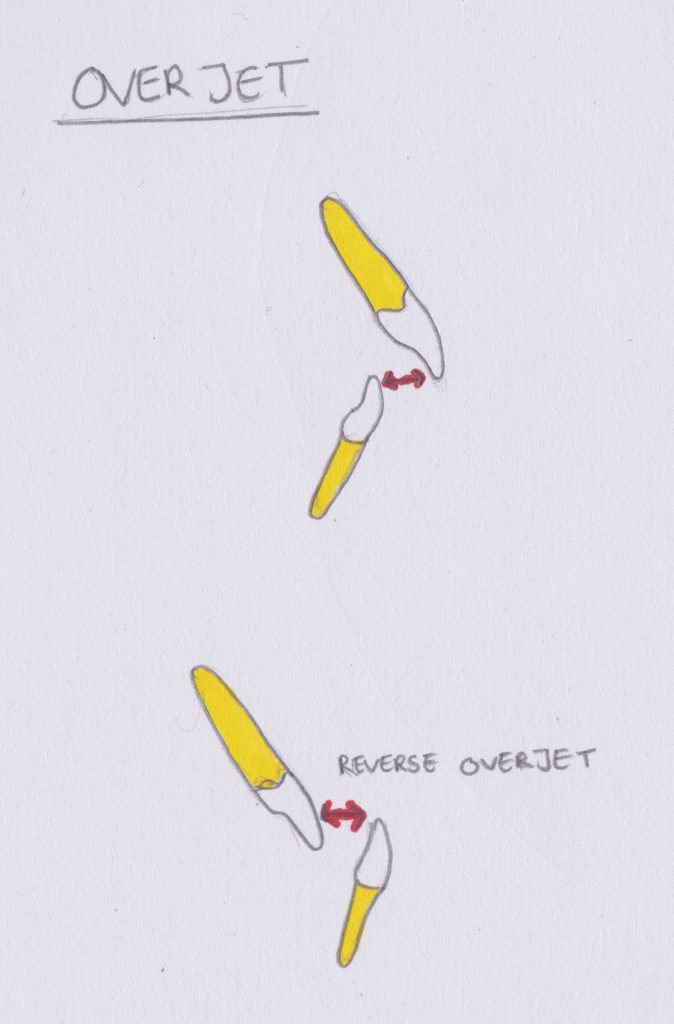
  • Assess the overjet. – the distance between the tip of the most prominent upper incisor to the labial aspect of the lower incisor. 
    • A normal overjet = 2-4mm
    • A reverse overjet is when the lower incisors lie in front of the upper incisors: this is still measured and recorded.
  • Assess for any anterior crossbites:
    • If there is a cross-bite (tooth lies out of the line of the arch) – they could be occlusal interference during jaw movement: this can lead to mandibular displacement on closure.
    • * mandibular displacement = a ‘nudge’ in the wrong direction when the mandible is moving in its normal field of motion. 
  • Assess overbite. – this is the amount the upper incisors overlap the lower incisors in the vertical dimension. 
    • Normal overbite = upper incisors overlap by 1/3 – ½ of the height of the lower incisor. / 2-4mm
    • An increased overbite can also been known as a ‘deep’ overbite. 
    • If the incisors do not overlap at all, this is known as an Anterior Open Bite (AOB). 
  • Assess the centre lines and record and shifts, by how many mm and in what direction. 
  • Assess any posterior cross bites.
  • Assess for any scissor bites: 
    • This is when a maxillary molar or premolar may occlude completely out of the arch and can cause trauma or mandibular displacement when biting. 
  • Assess for any posterior open bites (where the posterior molars do not meet in occlusion).
  • Assess both the mandibular arch and maxillary arch for:
    • Labial Segment:
      • Crowding/Spacing
      • Rotations
      • Inclination of incisors 
    • Canine angulation in relation to the occlusal plane. This can be average/proclined/retroclined. 
    • Buccal Segment:
      • Are molars well aligned/crowded/spaced?
      • Are there any problems with infra-occlusion of primary teeth?
  • Make a note of Oral Hygiene – this will be important if treatment will commence. 
  • Assess caries risk, periodontal stability, any trauma/previous trauma, attrition and erosion risks. 
  • Use the IOTN to grade the malocclusion: See our ‘IOTN Made Simple’ page for details.  

Here's a handy checklist for you to print and use when conducting an orthodontic assessment:

Conducting an Orthodontic Assessment Handout

Conclusion

You should now know how to conduct a thorough orthodontic assessment. This involves taking measurements such as LAFH and FMPA, as well as looking at all the teeth in occlusion and their positioning.

References

Useful Resources:

  1. Roberts-Harry D, Sandy J. Orthodontics. Part 2: Patient assessment and examination II. British dental journal. 2003 Nov;195(9):489-93.

Signup to get the latest information on courses, lessons and special premium content.

We won't sell or give your information away to any third party, see our privacy policy here>.

    In partnership with...
    linkedin facebook pinterest youtube rss twitter instagram facebook-blank rss-blank linkedin-blank pinterest youtube twitter instagram